Creating and configuring a Project
A Project is a subdivision of an Organization that represents a separate workspace (for example, a department).
Within a project, the following are configured: lines, employees, integrations, and metrics.
Creating a Project
You can create a project in two ways:
1. At the top of the personal account, open the dropdown list of organizations and projects.
2. Select the organization for which you want to create a project and click the add project icon next to its name.
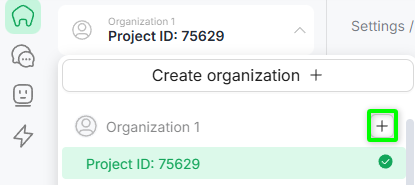
3. Enter the project name and click «Save».
The project will be created, after which the system will prompt you to proceed to line configuration in the new project.
1. In the left-hand menu of the personal account, go to the «Projects» section.
A page with a list of all projects will open.
2. Click «New project».
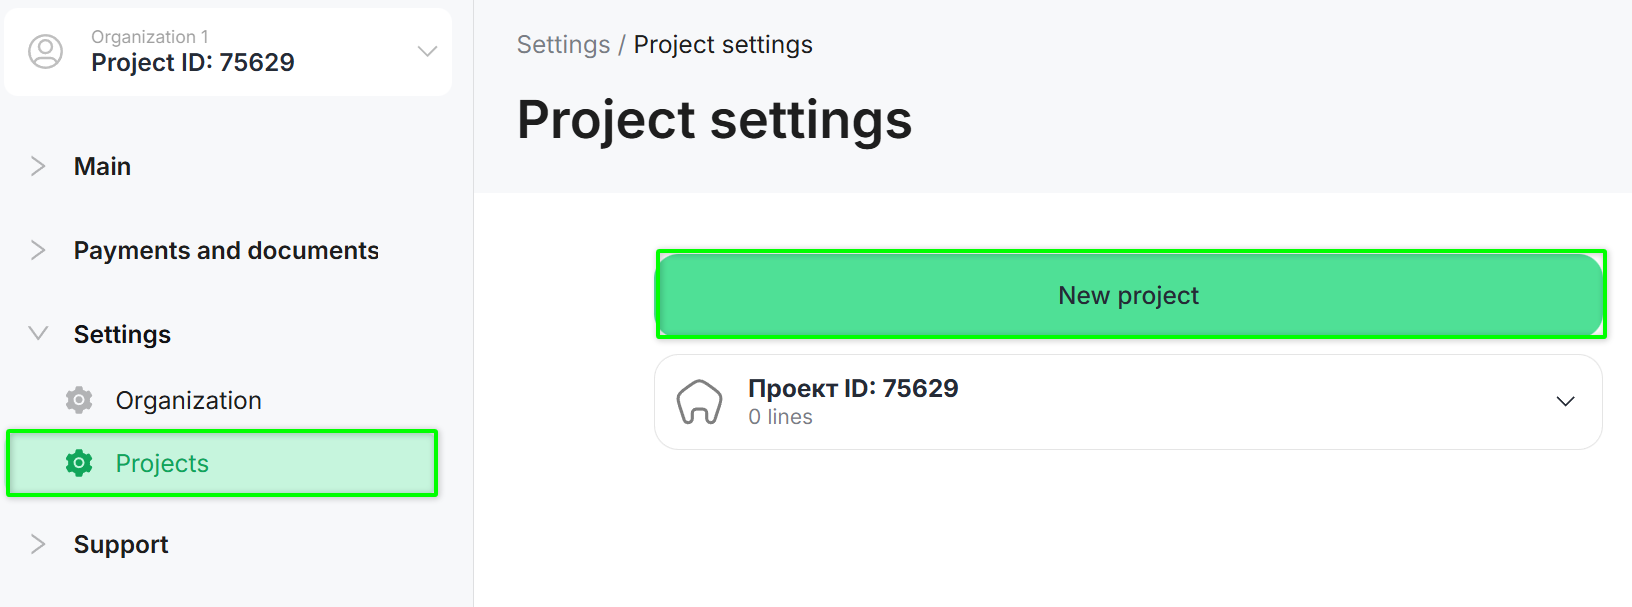
3. Enter the project name and click «Save».
The project will be created, after which the system will prompt you to proceed to creating and configuring lines.
Project Configuration
1. In the left-hand menu of the personal account, select the «Projects» section.
2. Select the project you want to configure.
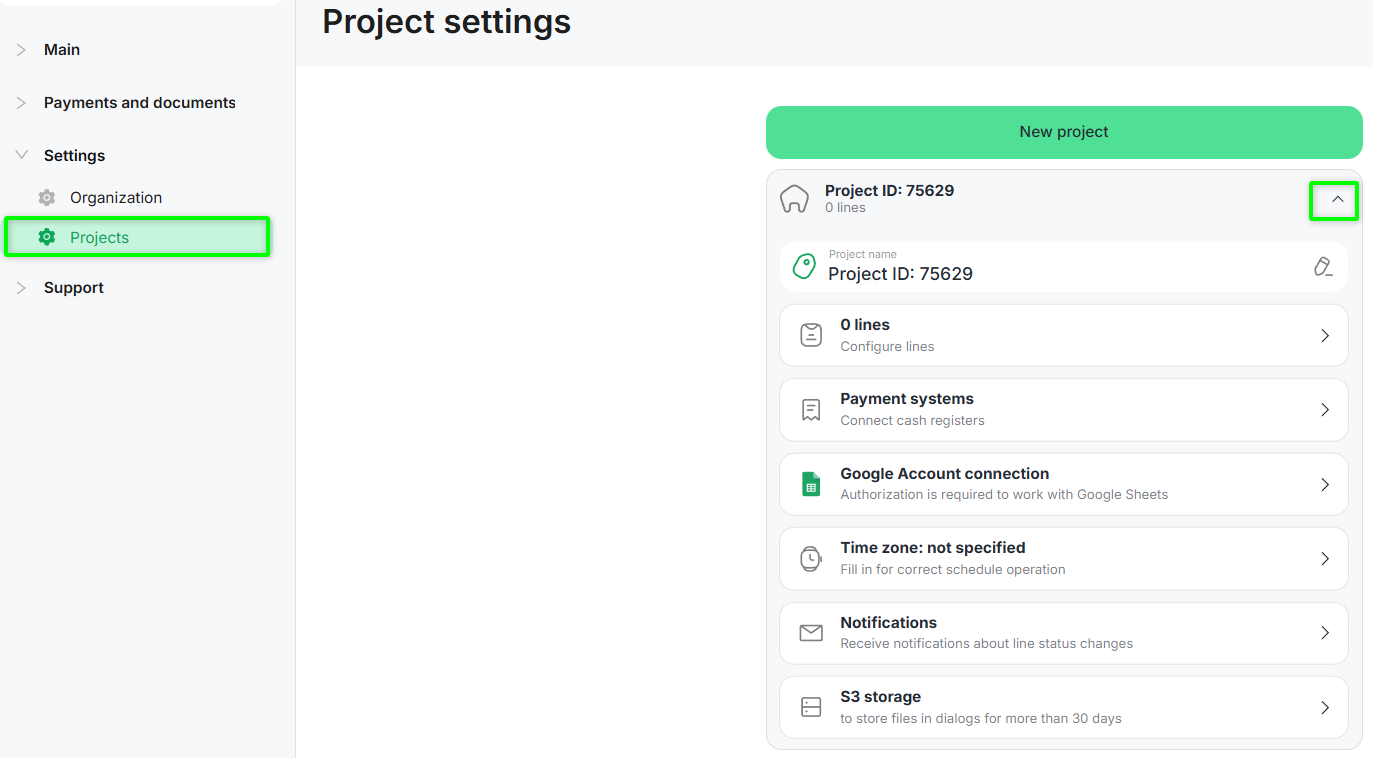
To change the project name, click the edit icon and enter a new value.
Redirects you to the «Lines» section, where line configuration is performed.
Detailed information is provided in the relevant article.
In the personal account, you can connect payment systems — PayPal.
This allows you to accept customer payments using the «Payment acceptance» block and then receive payment details via the «Payment information» block.
Step 1. Add a payment terminal
Click «Add terminal» and fill in the parameters depending on the terminal type.
Terminal — PayPal
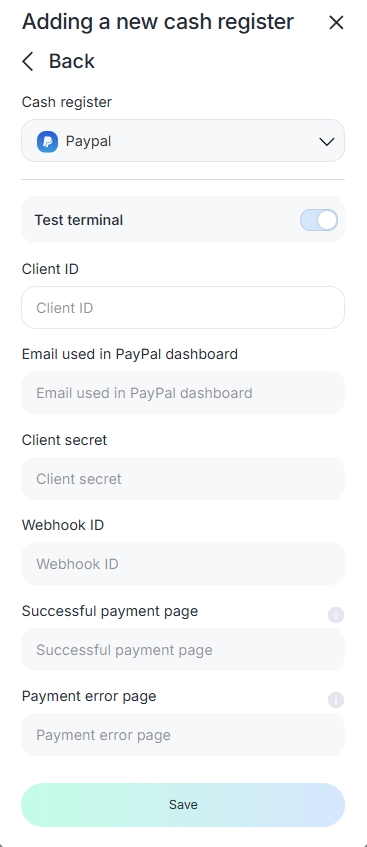
- Terminal — PayPal;
- Client ID — PayPal client identifier;
- Email — email used in the PayPal account;
- Client secret — client secret key;
- Webhook ID — identifier of the outgoing webhook for data transfer to ChatApp;
- Success page — URL of the page after successful payment;
- Error page — URL of the page shown in case of payment failure.
Step 2. Click «Save».
Viewing payments
After payments are made, information about them is displayed in the «Payment list» section.
To view payments:
- Go to the «Projects» section in the personal account;
- Open «Payment systems»;
- Select «Payment list».
All payments for the connected terminal are displayed in the opened window.
- Select the account to connect.
- Allow ChatApp access to the account by clicking «Continue».
- Set access permissions and click «Continue».
The account connection is completed. - Click «Grant access to spreadsheets».
In the opened window, select a spreadsheet and click «Select».
Access to the spreadsheet is granted.
On macOS in Google Chrome, for successful Google Account authorization, ChatApp must be added to exceptions even if it is not blocked by default.
- In browser settings, go to «Privacy and security» → «Third-party cookies».
- Add chatapp.online to the list of sites allowed to use third-party cookies.
In the Safari browser, you need to disable the «Prevent cross-site tracking» feature.
- Go to Safari → «Settings».
- Disable «Prevent cross-site tracking».
In the ChatApp personal account, a connected Google account may appear as unauthorized if the account has not been logged into in the browser.
This is because authorization is performed via cookies.
At the same time, Google Sheets functionality in the bot builder remains available and works correctly.
To display the account as authorized:
- log in to the required Google account in the browser (for example, in another tab);
- refresh the personal account page — the status should update.
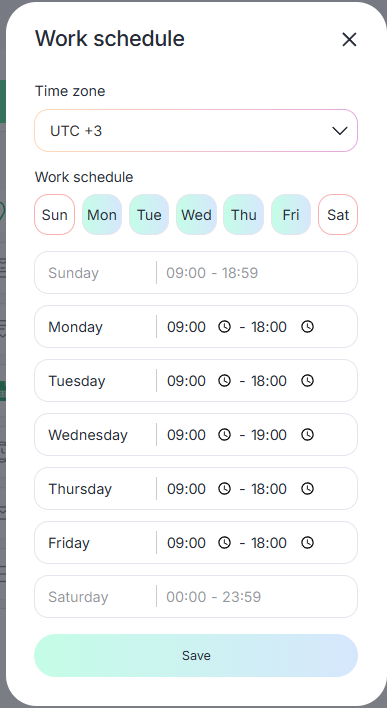
Non-working hours are used by the bot to send messages outside working hours.
In the pop-up window, select a time zone and sequentially click all required working days of the week.
Set working hours and click «Save».
Working hours can be entered manually or using the clock button.
Enable Telegram notifications to receive alerts related to specific lines.
Notifications include line expiration, channel status changes (authorization/deauthorization), a 7-day warning before line expiration, and line archiving.
For more details, see the article on notifications.
It is most commonly used to store images, videos, source code, document archives, and more.
Typically, objects in such storage have a unique identifier that can be used to access them.
A URL containing this unique identifier is a direct link to the object.
- Click the «S3 storage» field.
- Fill in the parameters:
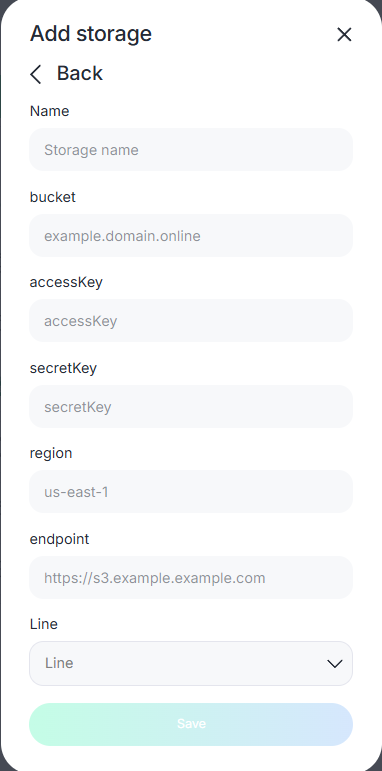
- Name — storage name;
- bucket — bucket name;
- accessKey — key ID obtained when generating a static key;
- secretKey — secret key obtained when generating a static key;
- region — region value. For Yandex Cloud Object Storage, always use «ru-central1». Other values may cause authorization errors;
- endpoint — storage URI. For Yandex Object Storage, use «storage.yandexcloud.net»;
- Line — select the line.
- Click «Save».
Let’s review connecting and using S3 storage using Yandex Cloud as an example.
- Go to the Yandex Cloud homepage;
- In the top-right corner, click «Connect»;
- In the opened window, check the boxes and log in;
- From the service list, select «Object Storage»;
- Click «Create bucket»;
- Enter payment details and click create;
- Open the created storage;
- Upload files;
- Click the uploaded file;
- In the top-right corner, click «Get link» and copy it.
Done! You now have a direct link to the file.
You can use it in the bot builder when sending files by URL without worrying about limitations.
In addition to Yandex Cloud, other S3 storages are available, for example:
- MailRu;
- Amazon;
- Bitrix24 Box.
Files can be sent using the «Send message» block.
For details, see the article.