Functional capabilities:
• sending personalized emails;
• using variables;
• attaching files;
• working via a connected SMTP protocol.
To send bulk emails without limits, an SMTP connection is required.
How to create a campaign
Go to your personal account → “Automation” → “Campaigns” → select Email.

If the selected channel is not connected to the line, campaign creation is unavailable.
In the demo line, there is a limit of no more than 20 recipients per campaign.
In a purchased line, there are no limits on the number of recipients.
To send Email campaigns, an SMTP (Simple Mail Transfer Protocol) connection is required.
SMTP is an email transmission protocol that ensures delivery of messages from sender to recipient.
-
Free SMTP service
All email services provide SMTP access with limitations on:
• number of emails;
• sending frequency.
Features:
• possible blocking if suspected of spam;
• emails may not be delivered if limits are exceeded;
• it is recommended to use a separate mailbox for campaigns.
Suitable for small and irregular sendings.
-
Mail server with ready-made settings
Example: Amazon SES.
Advantages:
• preconfigured parameters;
• stable infrastructure;
• high deliverability.
Before connecting, уточните:
• sending limits;
• scaling conditions;
• domain requirements.
-
SMTP based on your own hosting
It is possible to configure SMTP through a hosting provider if you have your own website.
Advantages:
• no strict limits on the number of sendings;
• full control over configuration.
Risks:
• possible domain blocking in case of spam complaints;
• необходимость самостоятельной настройки SPF, DKIM, DMARC.
-
SMTP via a third-party specialized service
Using a professional SMTP provider:
• reduces the risk of emails going to spam;
• ensures stable deliverability;
• suitable for regular marketing campaigns.
Recommended for systematic email marketing and large sending volumes.
-
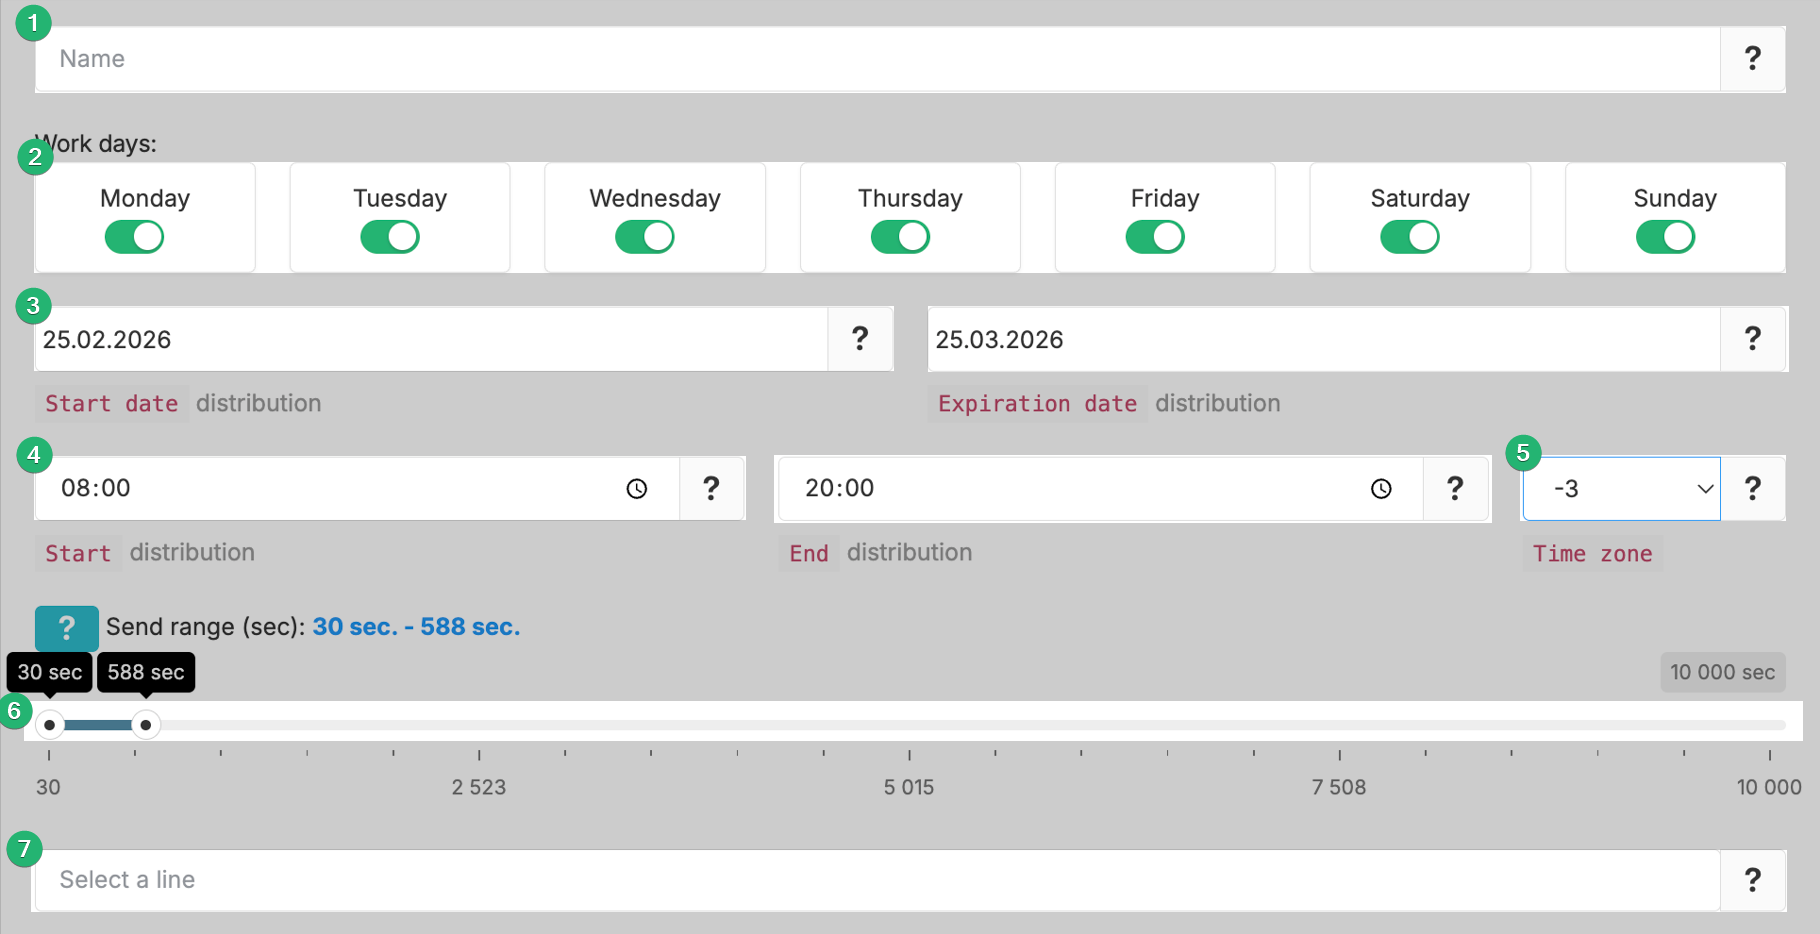
Campaign name
-
Working days (select the days when the campaign will be sent)
-
Start date and end date of the campaign
-
Start and end time of sending
-
Time zone. The campaign will run at the specified time.
-
Set the interval range between message sendings.
-
Select the line where Email is connected.
You can select one or several lines. If several lines are selected, sending will occur sequentially — one message from each line in turn.
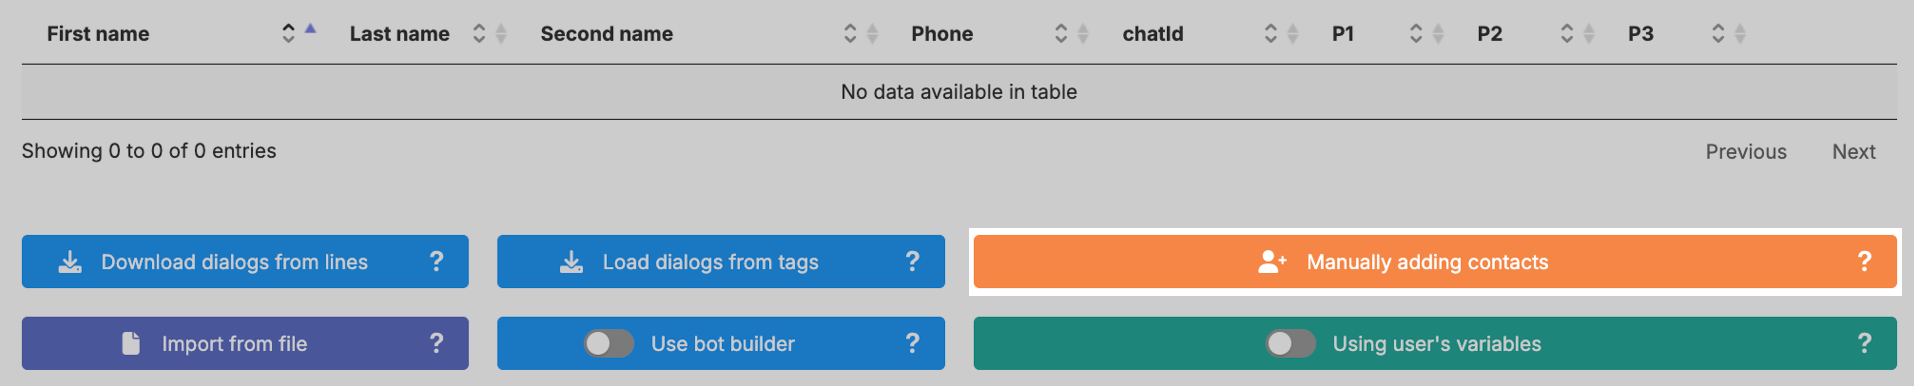
Click the “Upload dialogs from line” button — all chats from Scenario Dialogs for the selected line will be loaded into the table. Suitable for repeat sales, status notifications, and updates for current customers.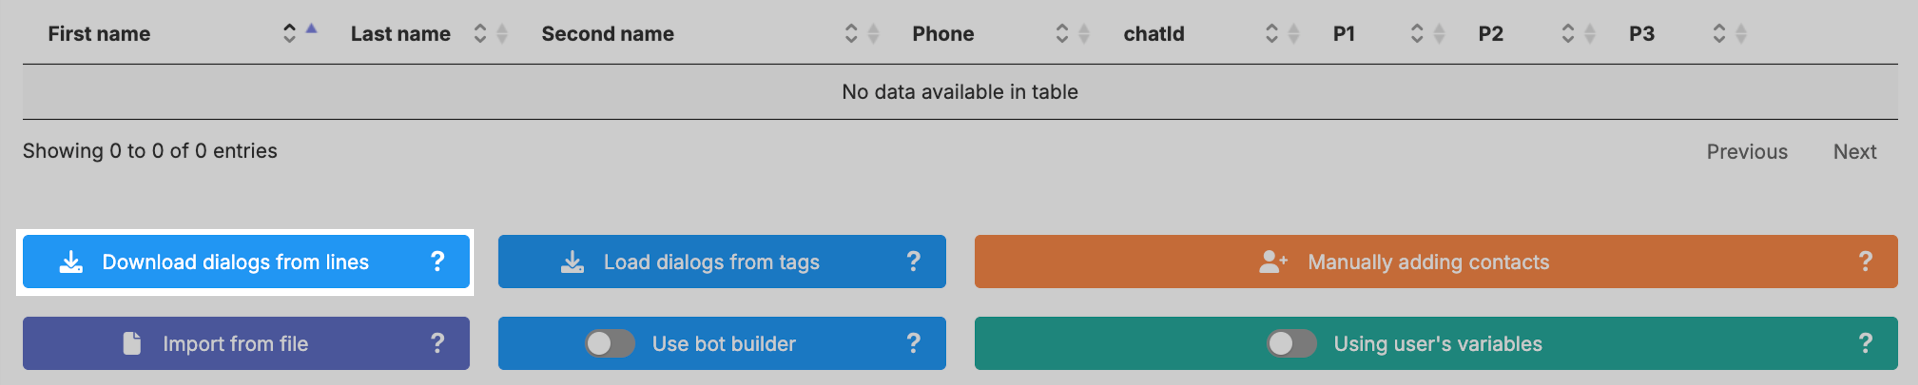
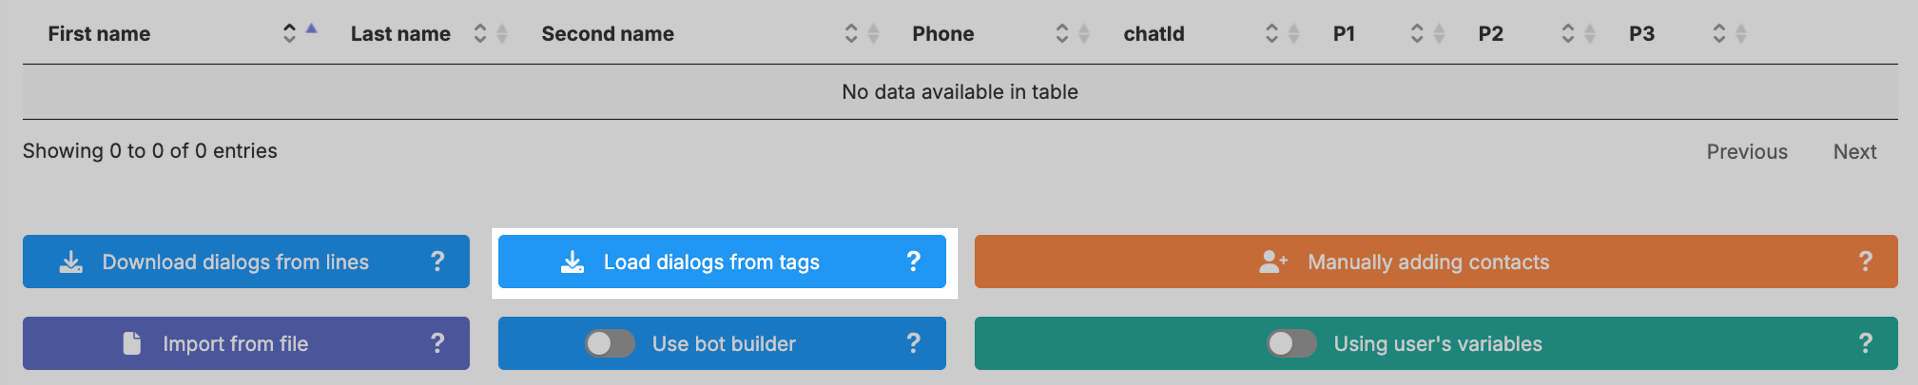
Click “Upload dialogs from tags” → select the required tag — the system will add all dialogs from Scenario Dialogs for the selected line that have the selected tag assigned.
This allows you to segment the audience and send messages to a specific group of customers, for example: “Paid” or “Awaiting delivery”.
To upload customer emails from a CRM, you must export emails from the CRM into a CSV or Excel file.
Instructions:
• How to export contacts from Bitrix24
• How to export contacts from amoCRM
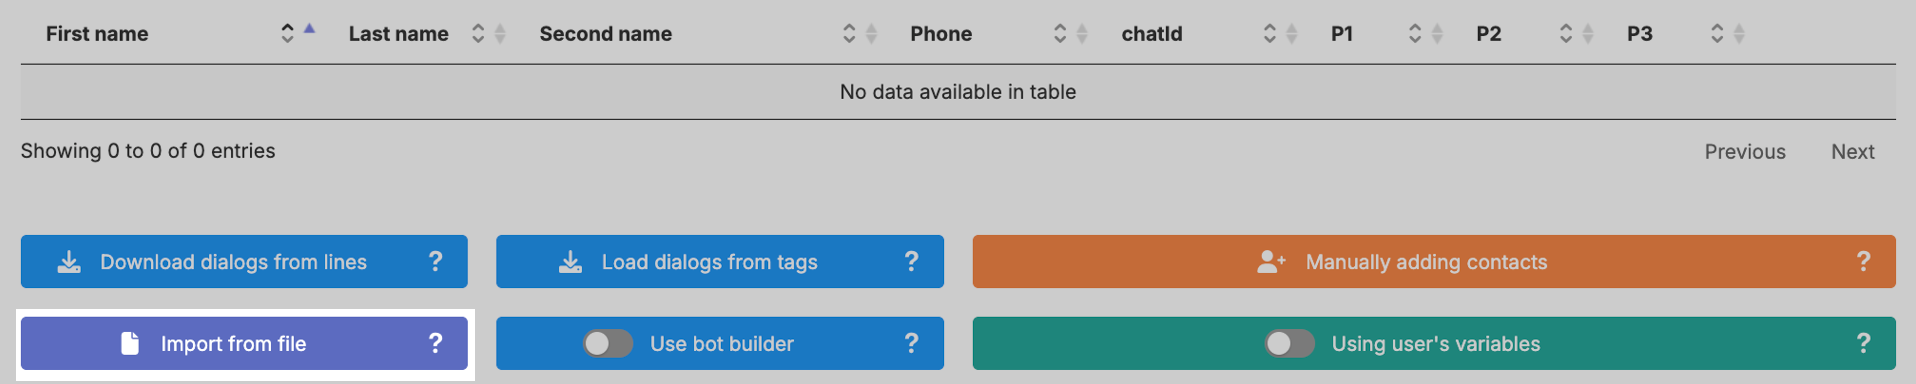
After export, the file must be edited according to the requirements for the campaign file. A sample file can be downloaded by clicking the “Import from file” button.
Click the “Import from file” button → select the file format — Excel or CSV → attach the file.
If the contact base is small or you are testing the campaign, you can add emails manually. Click the “Manual contact addition” button and enter the email address.
Enter the email subject in the “Text used in campaign” field.
If necessary, open the HTML editor by clicking “Source”. Enter the email content in the text editor. Attach a file up to 60 MB if required.

We recommend personalizing messages using variables.
This allows you to make the text more individual — you can insert the customer’s name, order number, and other data.
Variables can be: custom and system.
Allow you to define multiple variants of the same text element. For example, you can create a variable “Greeting” and add variations: “Hello”, “Good morning”, “Good afternoon”.
The system will automatically insert different variants into the message for different recipients.
Creating a custom variable:
Step 1. Activate the “Use custom variables” button.
Step 2. Enter the variable name.
Step 3. Add value options that will be inserted into the message.
Step 4. If necessary, click “Add another variable” to create an additional one.
Step 5. After creation, the variable will appear in the variables list.
Step 6. In the text input field, click the variable from the list to insert it into the message. The steps are illustrated in the screenshot.

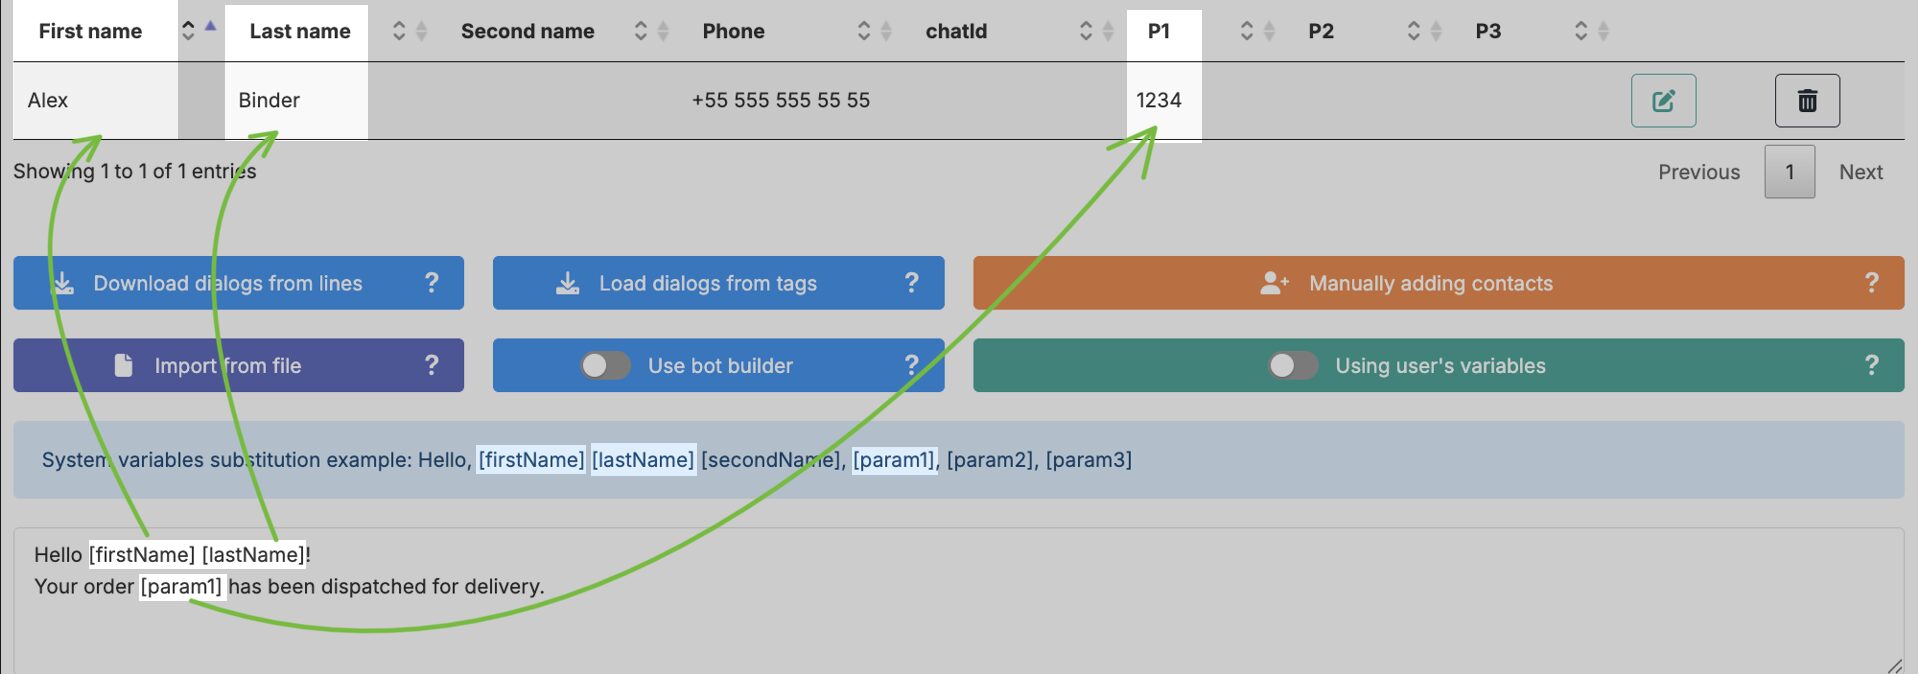
System variables insert data into the message text from the corresponding columns of the contacts table.
The mapping looks as follows (illustrated in the screenshot):
• [firstName] — takes the value from the “First Name” column
• [lastName] — takes the value from the “Last Name” column
• [secondName] — takes the value from the “Middle Name” column
• [param1] — takes the value from the “P1” column
• [param2] — takes the value from the “P2” column
• [param3] — takes the value from the “P3” column
You can use one or several system variables.
System variables will not be inserted into the message only if the corresponding field in the table is empty.
To launch the campaign, click the “Ready to launch” status → “Launch campaign”. The campaign will start according to the specified parameters.

While sending is in progress, let’s review the remaining control elements.
The “Edit campaign” button allows you to change previously set parameters and save the updated version.

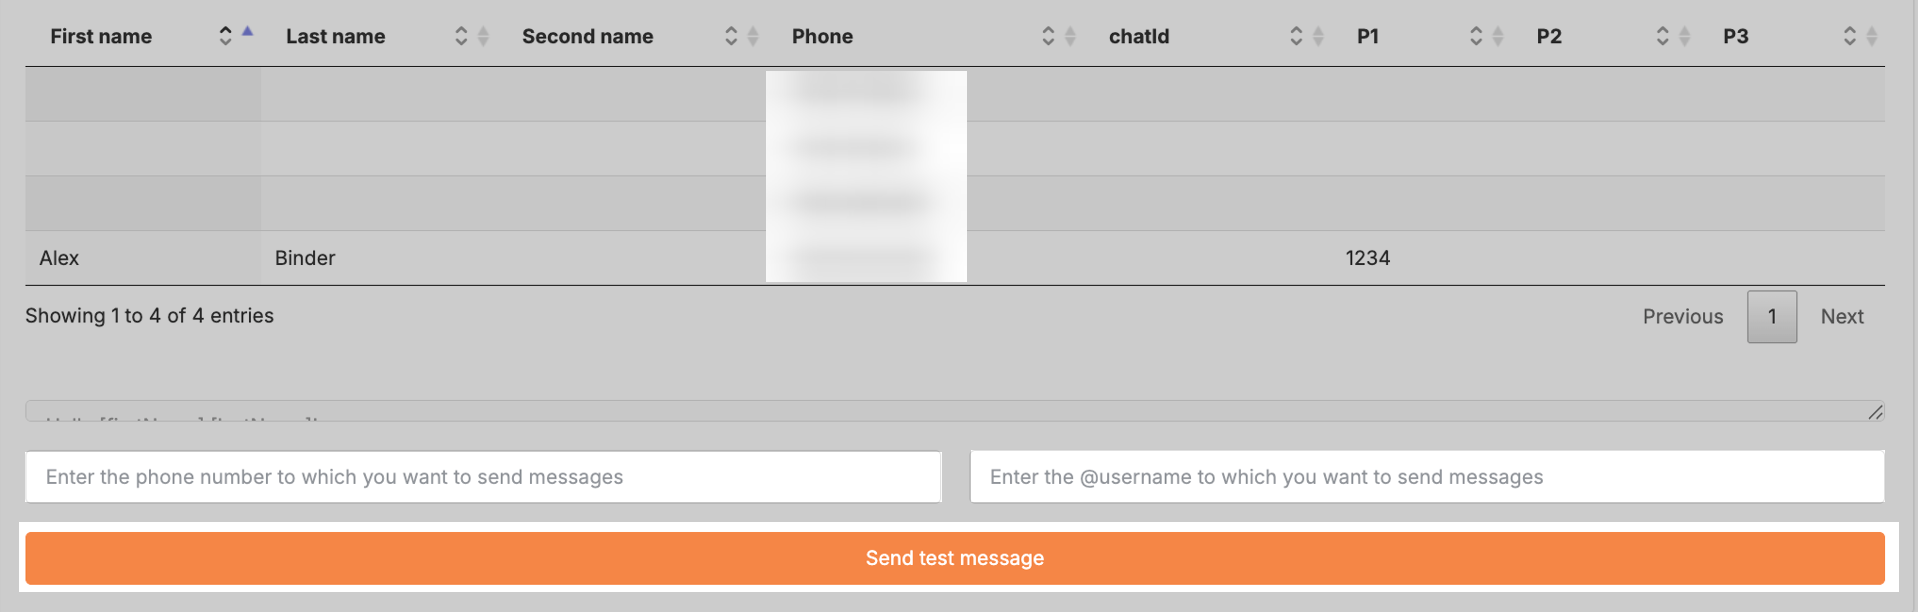
The “View campaign” button shows the current settings and contact list. Here you can send a test message to yourself to see how the campaign message will look to the customer.At the bottom of the page, enter your email address and click “Send test message”.

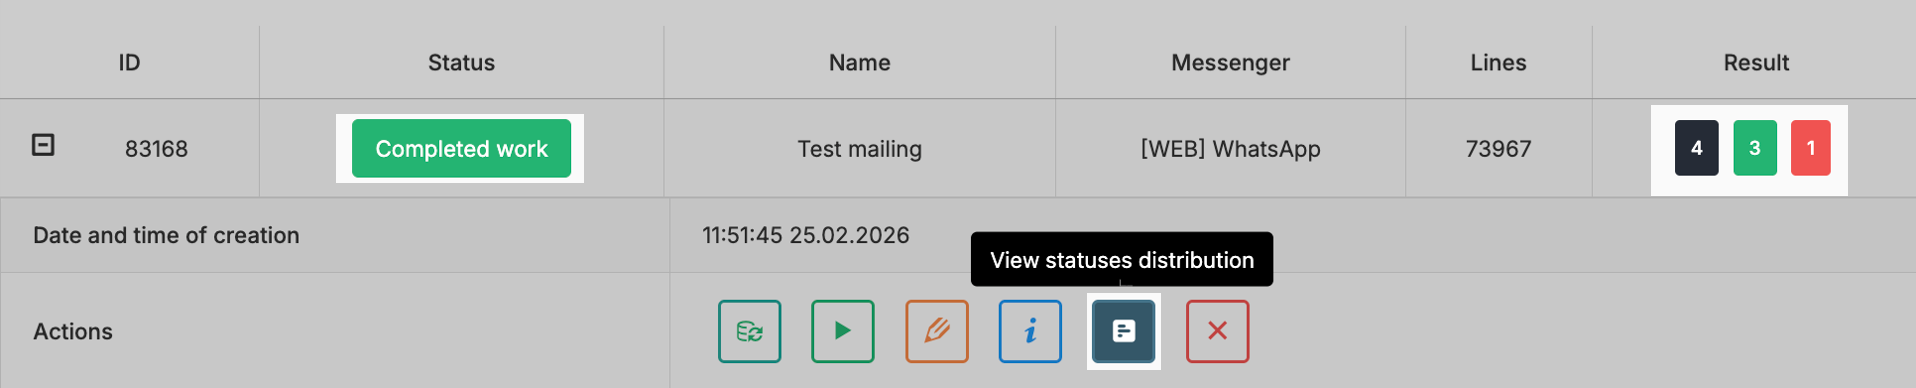
The “View campaign statuses” button displays the campaign report.

The “Delete campaign” button completely removes it from the campaign list without the possibility of recovery.

If necessary, a launched campaign can be stopped. In the campaign list, click “In progress” → “Pause campaign”. To resume sending, click “Launch”.

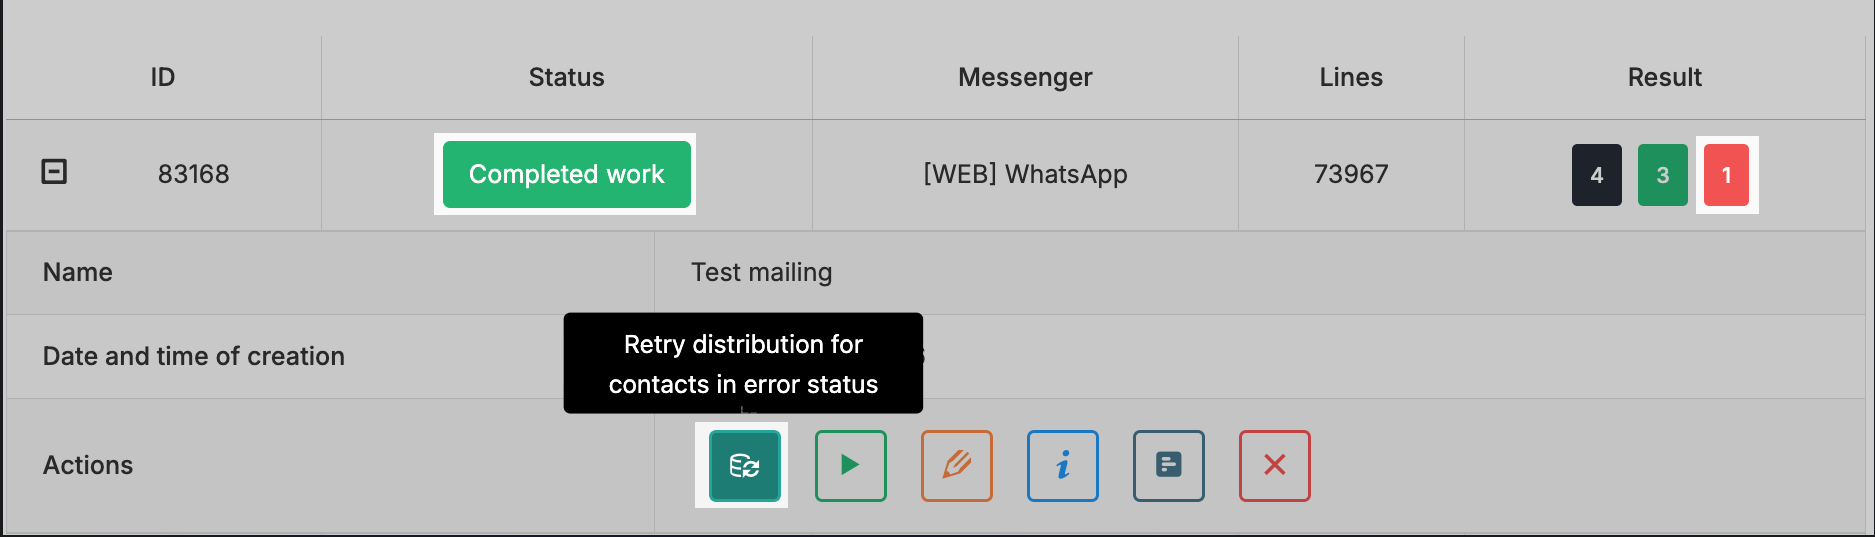
Resend campaign for contacts with the “Error” status.
Go to the campaign list → click “Resend for contacts with error status”. The system will resend messages only to contacts with the “Error” status.
Resend campaign for contacts with the “Not sent” status.
Go to the campaign list → click “Launch for not sent”. The system will start sending only for contacts to whom the campaign was not sent.
In the campaign list, the “Result” section displays the total number of contacts, the number of successfully delivered messages, and the number of failed sendings. Click “View campaign statuses” to see the detailed report.
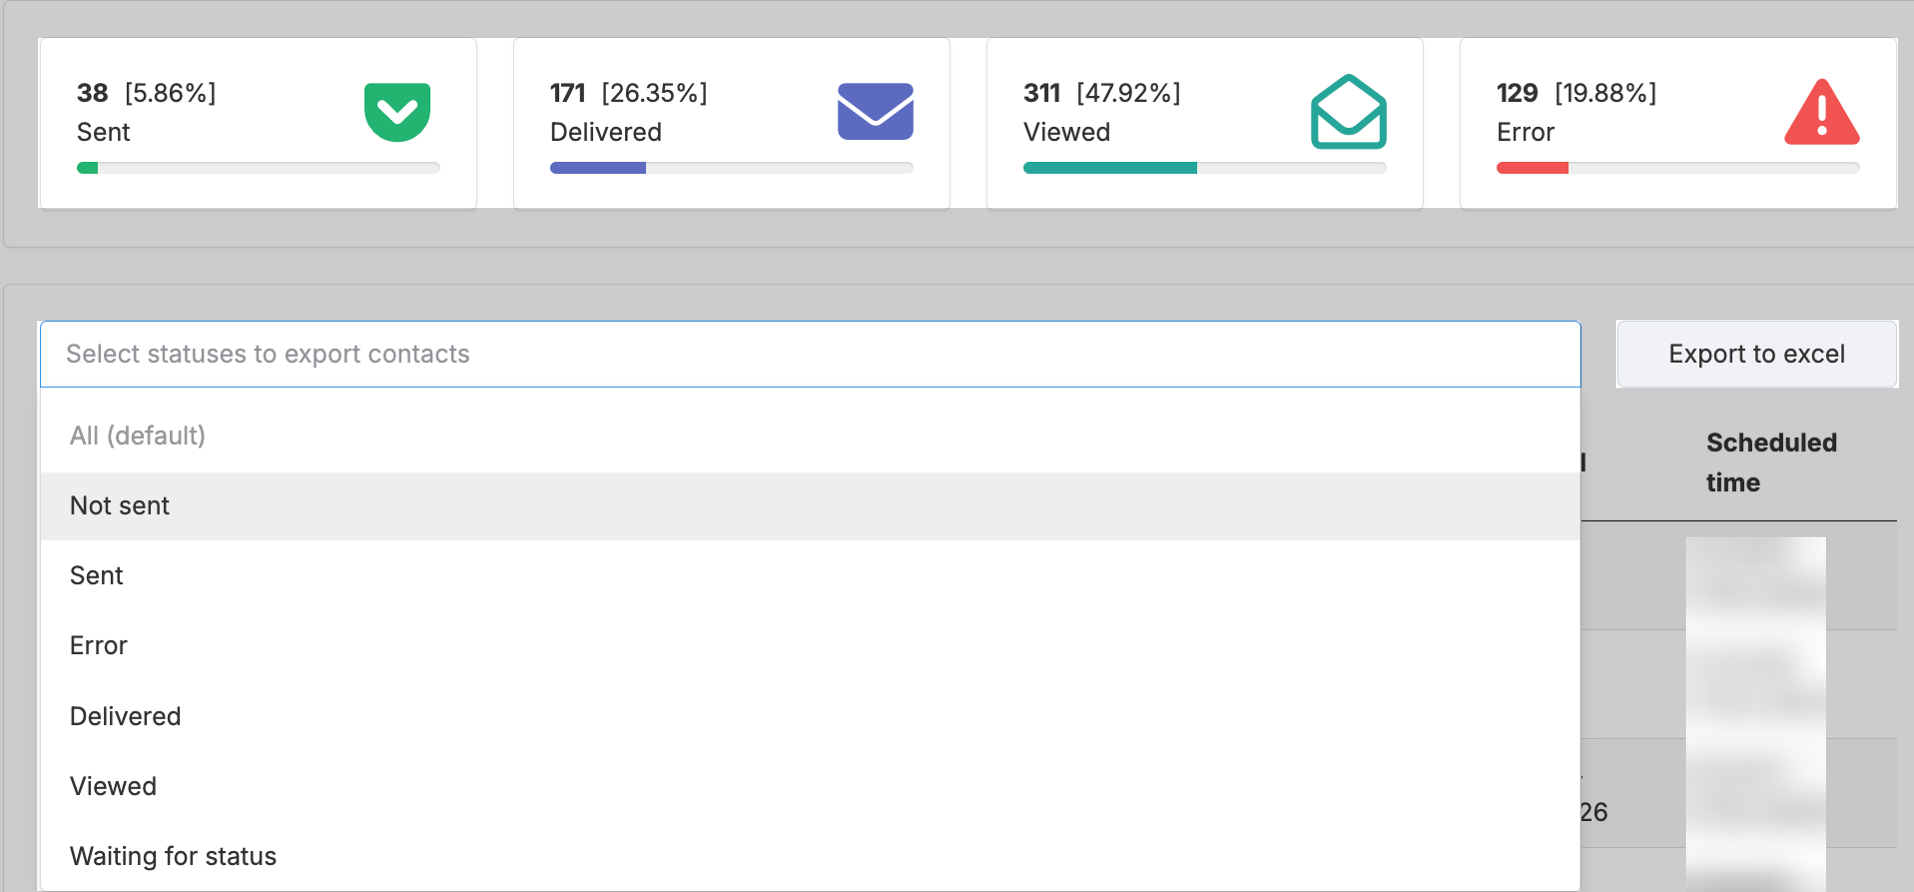
In the report, you can sort contacts by statuses.
You can export the report using the “Export to Excel” button.
For each contact, you can see the actual sending time, delivery time, and message open time.
The message goes through several status stages:
-
Pending — the message is queued.
-
Sent — the message has been sent from the ChatApp service.
-
Delivered — the message has been delivered to the recipient.
-
Opened — the recipient has opened the message.
-
Error — sending is not possible. If a contact receives the “Error” status, scroll down the page — the reason for the error is always indicated there.
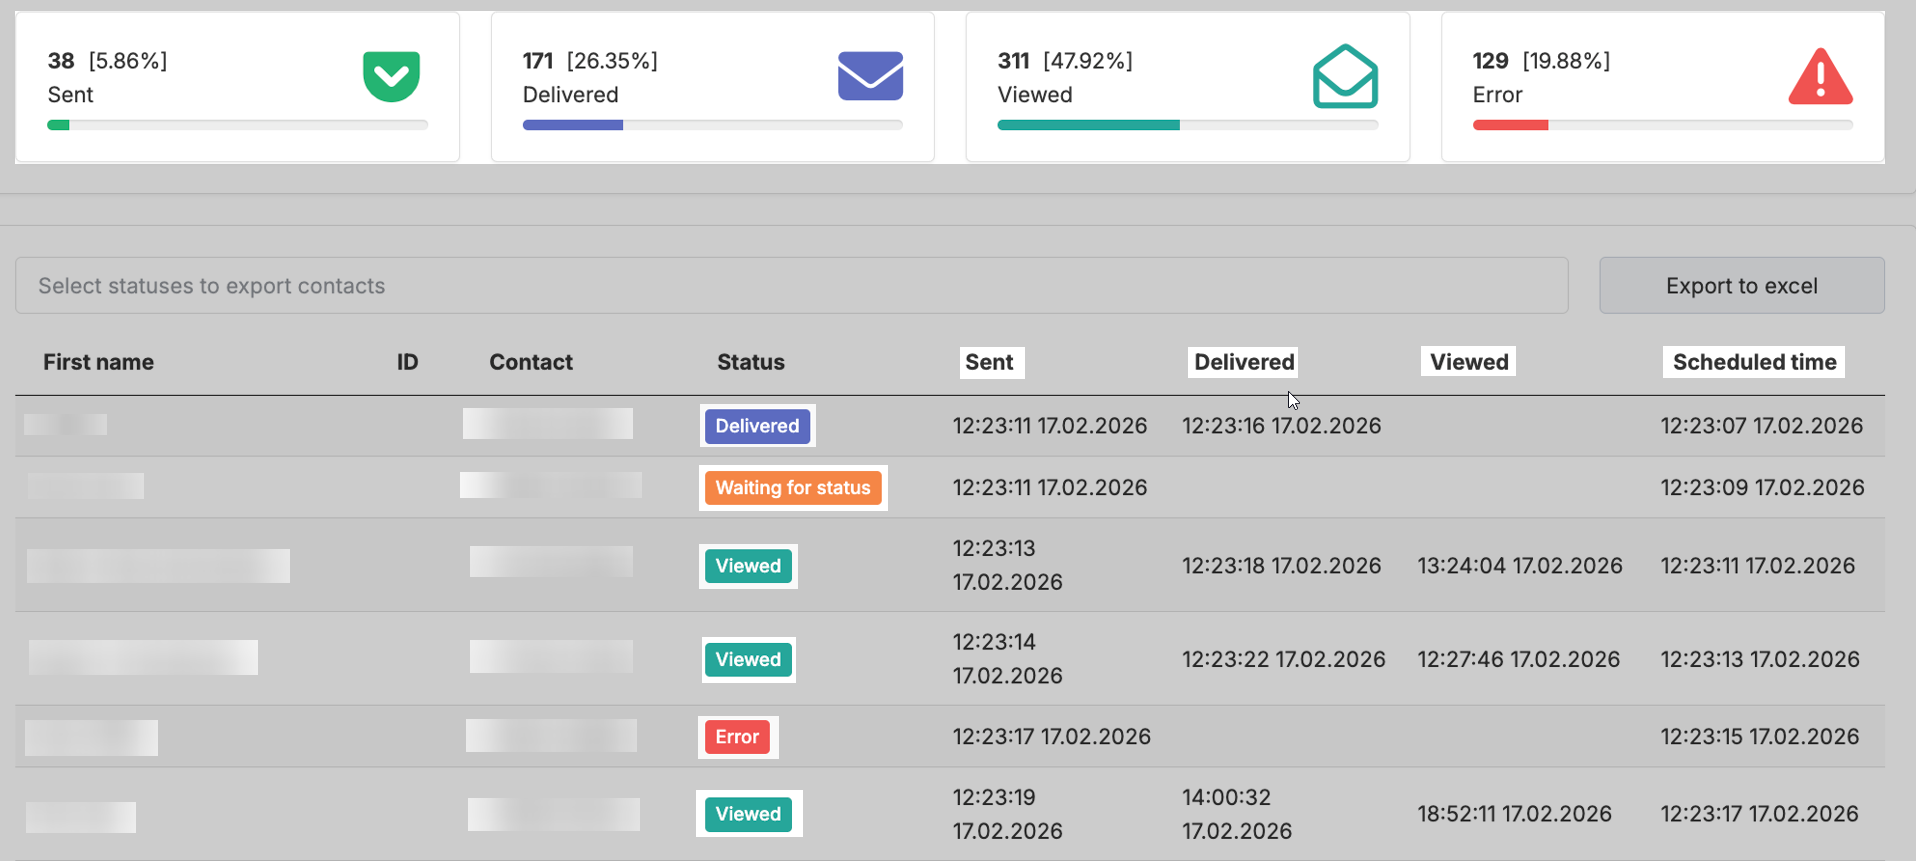
A contact sequentially moves from one status to another:
Sent → Delivered → Opened
or
Sent → Error
After transitioning to a new status, the contact disappears from the previous category.
For example, if a message moves from “Sent” to “Delivered”, it will no longer be displayed in the “Sent” section.