

Send the CRM document
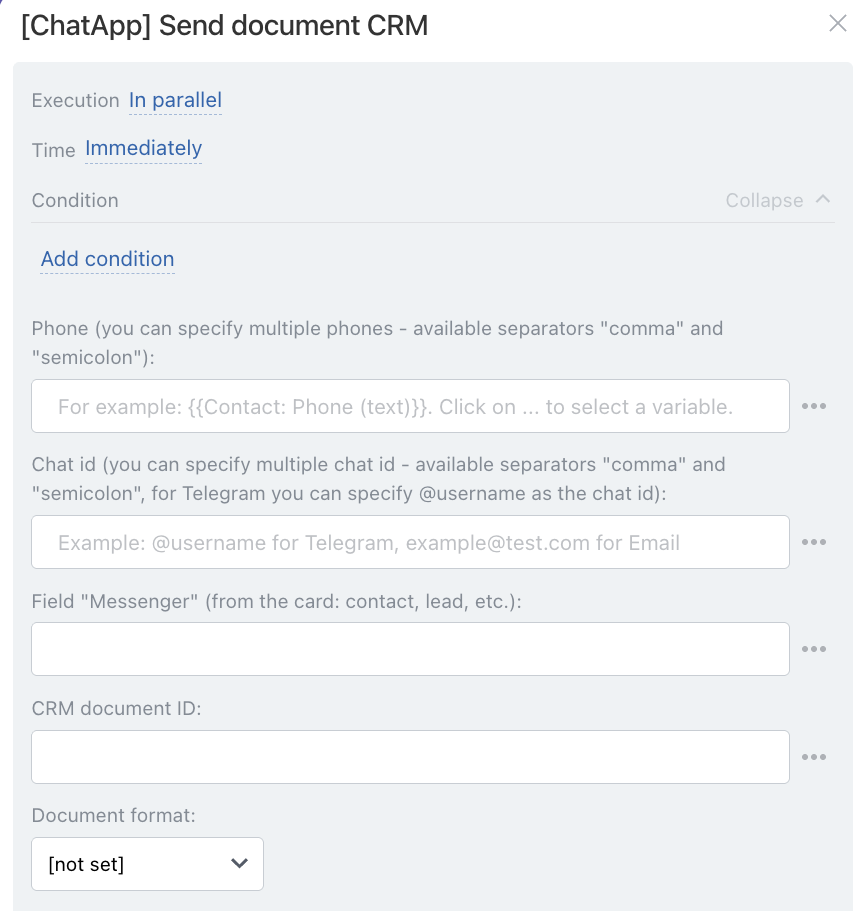
The robot “Send CRM document” works in combination with the standard Bitrix24 robot “Create document”. First, the document is created, then it is sent to the client.
How to add the robot:
Step 1. Go to the “Robots” section in the required CRM funnel.
Step 2. On the stage where the robot should trigger, click “+”.
Step 3. In the search, type “Create document”, add the standard Bitrix24 robot “Create document” and configure it.
Field “Wait for PDF conversion” — enable it if the document must be generated in PDF format.
Field “Create public link” — activate the checkbox and save the robot settings.
Step 4. Click “+” again, in the search type “Send CRM document”
Step 5. Select the robot [ChatApp for WhatsApp, Telegram, Viber] — “Send CRM document”. In the robot settings set:
“Sequentially” → “After previous robot”, so the document is created first and then sent to the client.
Fields “ID of created CRM document” and “Format of created CRM document” are configured as described below.
• Independently of other robots — starts immediately (default).
• After the previous robot — starts only after previously configured robots on this stage have completed.
When — the robot trigger moment:
• Immediately — when the card moves to the stage (default).
• After time — delayed start (set interval).
Conditionally — additional conditions for robot execution (if needed).
If the condition is met — the robot will run. If not — the robot will not run.
Choose only one method — otherwise messages will be duplicated.
Sending by phone number:
Enter the number in the “Phone” field — manually or via variable.
• Manually — enter one or more numbers (comma or semicolon separated).
• Via variable — the number is pulled from the CRM card: click the three dots → select entity (Lead or Deal) → choose the field where the number is stored.
If numbers are stored in different fields (“Mobile”, “Work”), use:
• for deal — {{Contact: Phone (text)}}
• for lead — {{Phone (text)}}
The “Phone (text)” variable pulls all available numbers from the card.
If multiple numbers exist, the message will be sent to each number. To send to a specific number — select the exact field containing it.
Sending by Telegram username:
In the “Chat ID” field click the three dots → select entity (Lead or Deal) → choose the field where the client’s username is stored.
• for lead — {{E-mail (text)}}
• for deal — {{Contact: E-mail (text)}}
Sending by chatID:
chatID is a Scenario Dialogs chat identifier. It is used when there is no phone number or username, but there is an active chat in Scenario Dialogs.
Step 1. Add the ChatApp robot [WhatsApp, Telegram, Viber] “Get chat ID from Messenger field” and place it before the main robot.
Step 2. Set the main robot to: Sequentially → After previous robot.
Step 3. In “Chat ID” click the three dots → Robots → [WhatsApp, Telegram, Viber] “Get chat ID from Messenger field” → select chatID variable.
Sending via “Messenger” field:
The “Messenger” field is used when there are no contact details but there is an active chat in Open Lines.
Requirement — the “Messenger” field must be filled in CRM:
• in leads — filled in the lead card;
• in deals — filled in the contact linked to the deal.
The field is not filled manually; it is created automatically if:
• the client wrote via Open Lines;
• or you contacted the client via Open Lines.
To send via this field, use:
• for lead — {{Messenger (text)}}
• for deal — {{Contact: Messenger (text)}}
In “Format of created CRM document” specify the format in which the document will be sent:
— if “Wait for PDF conversion” is enabled in the “Create document” robot, choose PDF;
— if not enabled, choose DOCX.
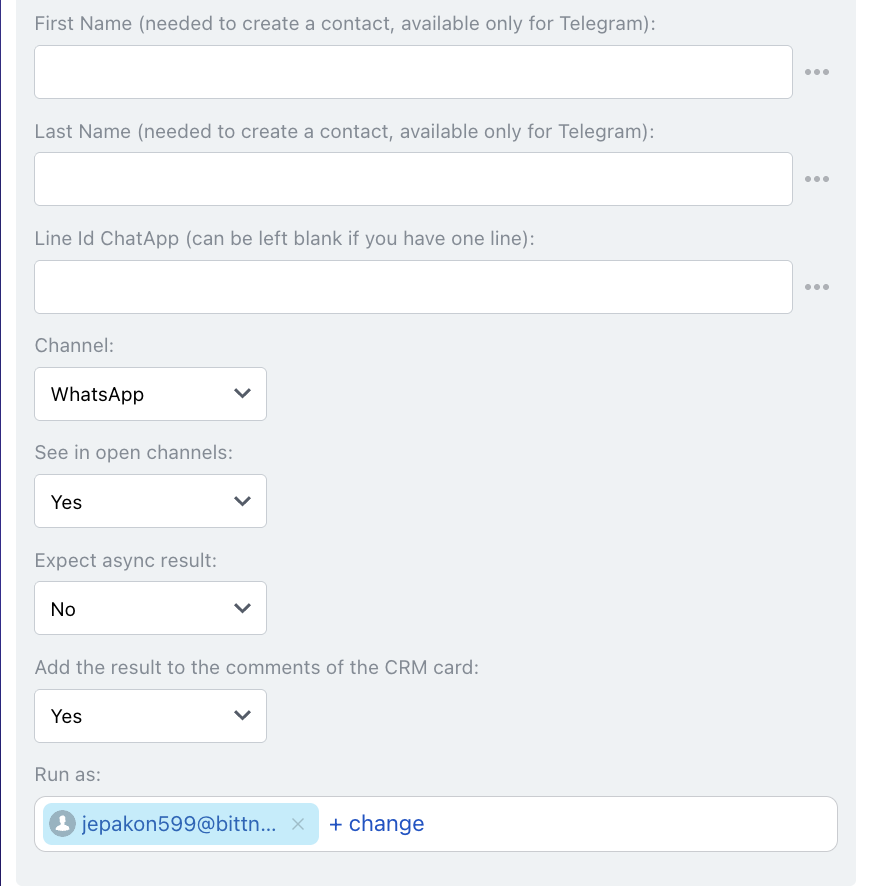
Enter first and last name if the number is not saved in CRM — a new contact will be created.
In “Channel” select the communication channel from the specified line.
The message will be sent through the selected channel.
When enabled, the robot waits for the messenger response and returns the final delivery status. If delivered — success is returned; if not — an error with a reason. This may increase execution time.
To display results in CRM timeline, set “Add result to CRM comments” to “Yes” or add a Bitrix24 “Add comment” robot after it.
